Home Tree Atlas

Simple DIY Clay Photo Display Stands

DIY Air Dry Clay Photo DisplayAfter working on the travel photos confetti project, I started looking for more ways to display photographs around the house. This is the first time I’ve used air drying clay (it feels funny) – so there was a little bit of experimenting involved.

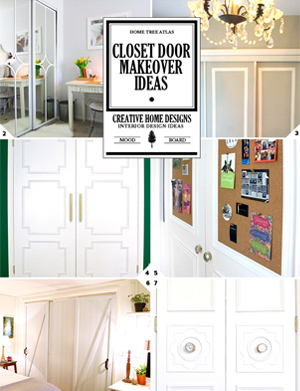
Here is the first batch of diy photo stands:

Clay Cutting Board

I was using DAS air drying clay, so after cutting a piece of the clay to shape I waited 5-10 minutes for the clay to harden a bit before creating a grove for the photos to sit in.

I thought I could create tiny little pieces, but soon realized that air drying clay is pretty light weight and so any large photographs would tip the photo stand over. The first batch was hand molded. It’s quite tough to get a perfect shape (sphere, cube, etc.). So for the next batch I went looking for things I could use as molds/cutters.

The triangular pencil sharpener ended up making the best shapes:

Cutting Molds

Here are some of my travel photographs I printed out on some thick watercolor paper:

Travel Photos

Polaroid Style Photos Printout

Here are some pictures of the final pieces, painted with glossy white and black paint:

DIY Photo Stand

Clay Photo Stand

Close Up Photo Stand

Clay Photo Displays

Trying out different shapes:

Polaroid Photo Stand

Clay Shapes

Miniatures:

Mini Displays

In the end, the triangle shape worked best:

DIY Clay Stands

Related Posts:

May 30, 2013 in DIY, Made By HtA

A Design Guide for Dining Room Lighting Ideas

Dining Room Lighting Ideas

When it comes to dining room lighting ideas, the most important area to focus on is the table. People want to see what they are eating, and you can change the mood of the room with the right lights.

The lights fixtures to go for in this area will depend on the kind of dining table you have. Whatever table style you have, long/short/round, you’ll want to have lighting that comes down from the ceiling, and brings the light closer to the table.  If you have a long table, then you’ll want to have multiple pendant lights going across the table just like in pictures (1) and (2). For smaller tables, like a round one, an elegant single pendant light will work best. Some great styles include the ones in pictures (3) and (4), along with drum lights. Another option would be a mini chandelier (5). Picture (6) shows a dining room that is using multiple types of lighting fixtures (pendant and wall lights). Using different types of lights is always a good choice when it comes to lighting design because you create different layers and lighting effects – making for a better lit space.

A good idea would be to have the lights above the table hooked up to a dimmer switch (7). This way you can instantly change the setting from a bright normal dinner to a more romantic and intimate one.

When it comes to more general ambient lighting in the dining room some ideas include: wall lights, cove lighting which can be seen at the top of picture (8), and modern recessed lights (9)1/2/3/4/5/6/7/8/9

Related Posts:

May 29, 2013 in Dining Room, Lighting

Unique Ideas for Bathroom Towel Bars and Racks

Bathroom Towel Bars and Racks

Driftwood makes for elegant DIY bathroom towel bars and holders. There are quite a few ways to go about this. For example, fitting a long piece to the wall will create a bar to hang the towels on as seen in picture (1), or how about having some larger pieces leaning against the wall to act as hanger (2). Picture (3) shows some pieces of wood held together by cord. Or how about using a piece of drift wood as a back plate for some hooks like in picture (4). Another beachside, coastal style hanger idea is to use rope and hooks (5).

A ladder is a great way of hanging up towels in the bathroom (6). You can even find ladders that have shelves that can be used as storage for other items (Ideas for Decorating With Ladders).

If you looking for ways of hanging the hand towels around the vanity and space is an issue, look to put a towel rack underneath the sink (7). Or better yet, attach a railing to the front of the vanity (8). Another space saving idea is to fit rails to the back of the door just like in picture (9), or fit hooks underneath any cabinets or shelves.

Picture (10) shows a quirky way of creating some towel racks. Fitting hangers to the wall upside down lets you hang up a number of towels. 1/2/3/4/5/6/7/8/9/10

Here are some other bathroom storage posts to get more ideas from:

May 28, 2013 in Bathroom, Storage

DIY Shadow Box Wall Decor

DIY Shadow Box Wall Decor Home Tree Atlas

DIY Wall Decor

This was a simple project. After seeing the shadow boxes on Restoration Hardware with the sea fans, I was inspired. The first step was trying to find a square shadow box – enter the IKEA RIBBA frame. The only other major things I needed were some decorative organic pieces that I could spray paint, and some fabric for the background.

My collection after taking a walk around the neighborhood.

DIY Wall Decor

An IKEA shopping bag comes in handy when spray painting.

Spray Paint Wood

The plan was to create two shadow boxes. One with a dark fabric background with a light/white colored decor piece. The second box would have a light colored background with a black display piece. Here are the semi-finalist decor items.

DIY Wall Hanging

Home Decor Wood

Spray Paint Leaf

After seeing how the pieces turned out after being spray painted (also considering the size and how decorative they are) here are the final two pieces.

Wood Spray Paint

Final Piece

Here is the fabric choice. There is the off white canvas style fabric which I had lying around. The grey one was hard to come by. A) I didn’t want to spend a whole bunch on it (men’s suit fabric comes at a high price), and B) I didn’t want there to be any pattern (which a lot of them have) or any shine. I ended up finding this piece in a luxury fabric shop in the scrap basket.

Fabric Choice

The next step was cutting a piece of cardboard to stick the fabric to.

Cutting Board

The board and fabric cut and glued together.

Fabric Glued

The back of the organic pieces were a bit odd. I ended up gluing a strip of fabric into the crevices and glued the other end to the fabric board.

Attachment

And that’s it. I stuck with basic colors black/white for the custom DIY shadow box designs, but am curious to know how colorful versions of this would look like. Here are some close ups.

Fabric Wall Decor

White Wall Hanging

Black Decor

Close Up

White Shadow Box

Related Posts:

 Travel Photos Confetti Display – Plus DIY Printables Guide

Home Tree Atlas DIY Projects

Related Posts Plugin for WordPress, Blogger...
May 24, 2013 in DIY, Made By HtA