Home Tree Atlas

DIY

Home Decor Ideas: Using Leather

Leather Decor Ideas

It’s not easy to find ways of adding leather to a home’s decor without making it look tacky or overkill rustic. Here are some simple and modern DIY leather decor ideas:

Chic Storage Containers

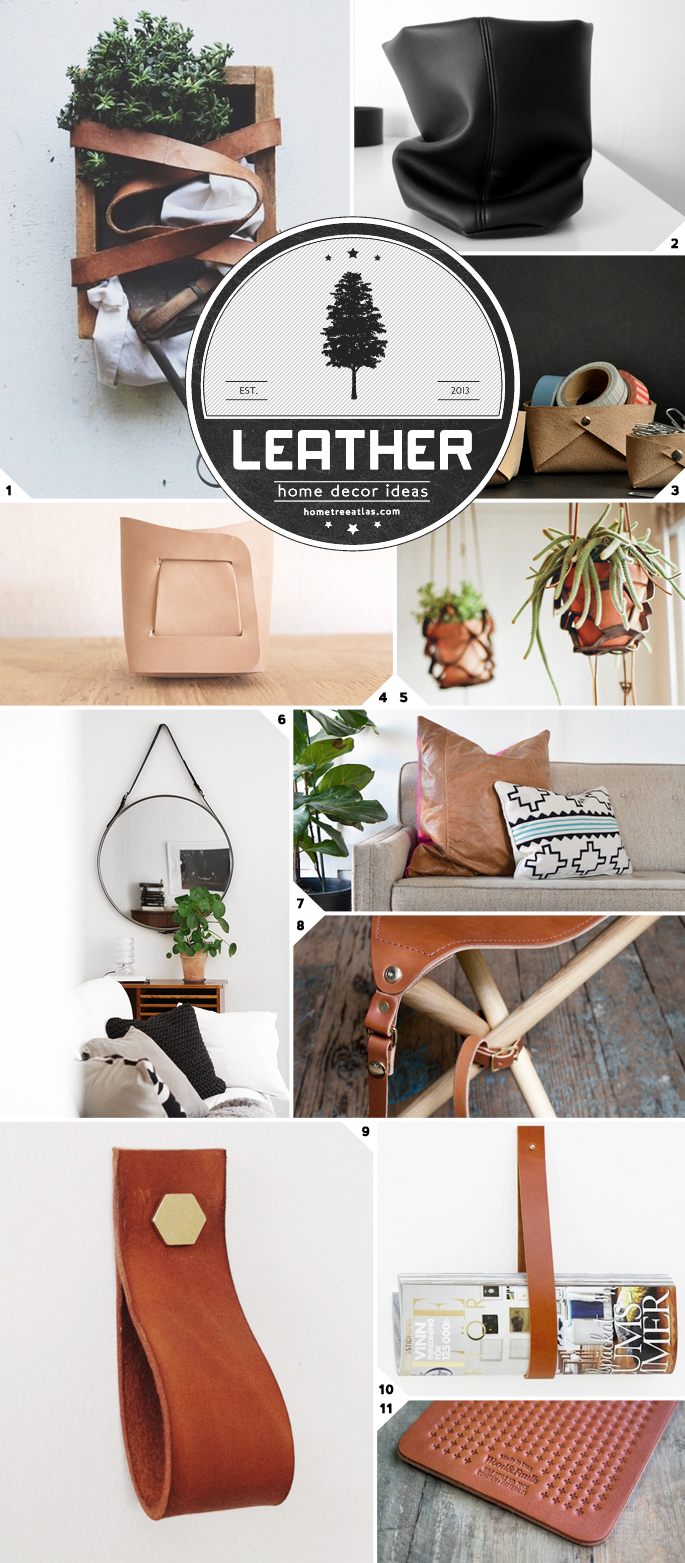
A great home decor DIY project to make with leather is a storage container. You’ve got the large tool box design in picture (1) which combines a wooden crate with leather handles. Then you have small leather containers that can be used for holding stationary, letters, or clutter around the house. Follow along with the instructions on how to make the elegant black DIY leather bag in picture (2) by Design and Form. Or there are the folding leather baskets (3) by Between the Lines. Over on the Gildem’s Etsy store you can find the Japanese style leather bins seen in picture (4).

Hanging Up: Leather Wall Decor

Leather does make for great looking plant hangers. Design Sponge has instructions on how to make the ones in picture (5). Or how about taking a round mirror, and using an old belt or a leather strip hang it up for a makeshift sea Captain’s mirror (6).

Sitting in Comfort

Sitting in a plush leather chair is pretty freaking relaxing. On a smaller scale, Mandi from Vintage Revivals bought an old beat up leather couch on Craigslist just so she could ‘skin’ it to make leather pillows (7). Check out the ‘how to’ here. Another project for reusing an old couch’s leather would for creating a DIY leather headboard.

The charming camp stool in picture (8) was made by Wood & Faulk. These would make for great add on seating in the living room, or for a foyer stool to help put on or take off shoes.

Home Decor Leather Accents

I believe the best way to add leather into a home’s decor is with small touches. Just like the closet handles made by The Brick House (9). If you use longer strands of leather then you can make hanging magazine racks (10) just like the ones from Leibal.

Another small leather touch is to have leather coffee or dinner table coasters. The elegant ones seen in picture (11) were made by Wood & Faulk – they sure know how to use leather.

Related Posts:

January 3, 2014 in Decor, DIY

Home Decor Ideas: Using Mason Jars

Mason Jar Craft Ideas

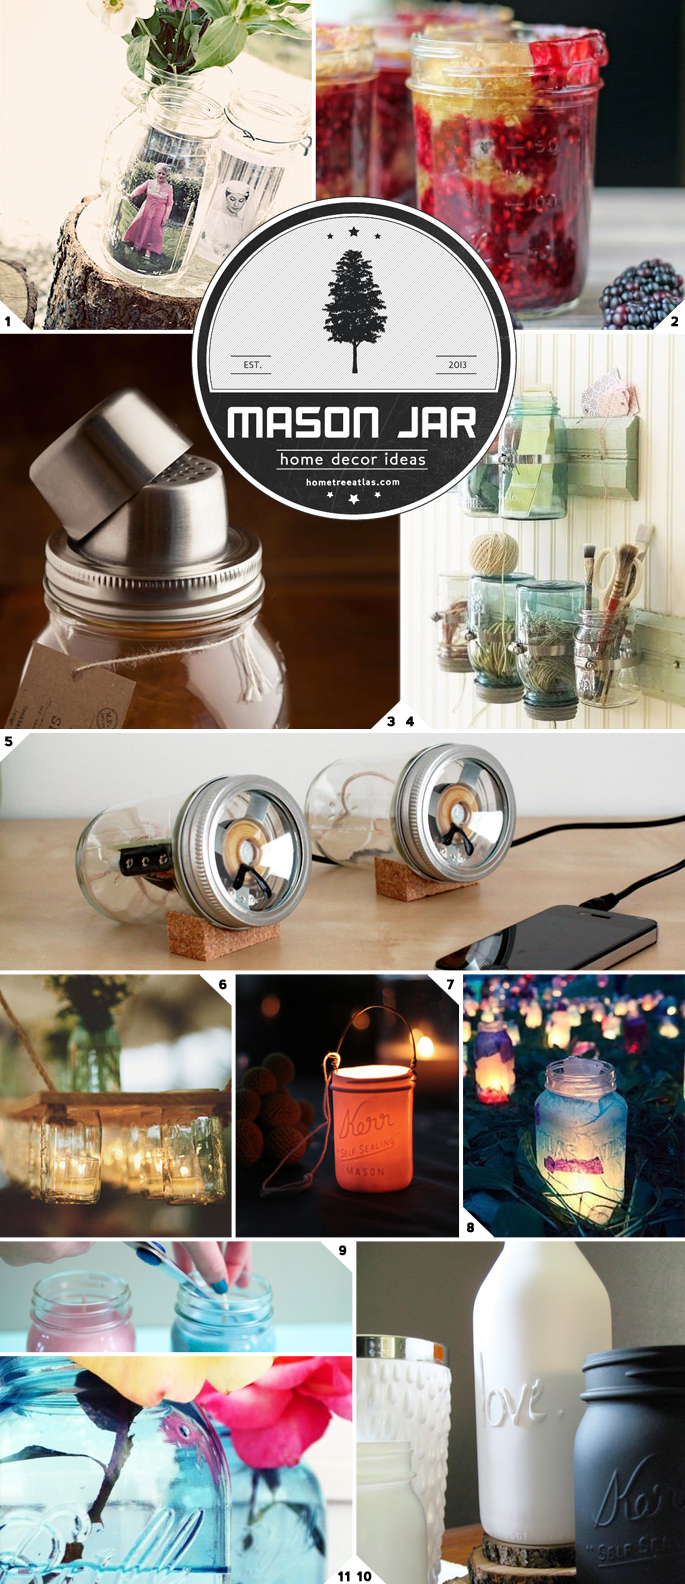
The reason I like Mason Jar craft ideas is because glass is a classic, timeless and premium material. Would you rather drink out of a plastic or glass cup? Because of the vintage feel Mason Jars have, a lot of people have done amazing things with them.

Housing Memories 

One of my favourite kinds of DIY projects is finding different ways to create photo stands. Yup, you can use Mason Jars to showoff photos just like the ones from a wedding in picture (1). The more vintage looking the photos the better – how about using black and white photos?

In the Kitchen and Beyond

A great way to decorate a kitchen is to showcase great looking kitchenware in open or glass cabinets. Say you have copper pots – why not hang them on the wall. Or if you use mason jars as bowls (2) or even as a drink mixer (3), have them out on display. You could even attach Mason Jars to a strip of wood to create a storage rack, like the crafting wall in picture (4).

Getting Technical

This next Mason Jar DIY project was an eye opener. Sarah Pease created audioJar, speakers made out of Mason Jars (5). I wasn’t expecting that…

Lighting Up the Jars

Next we come to the lighting section. I really like the rustic DIY Mason Jar chandelier that uses candles in picture (6), created as wedding decor. Pigeon Toe use to make mini ceramic votive lanterns, using the Mason Jar design (7) – which are classy. And what a great way to light up a garden (8) sticking colored crafting paper inside the jars, then using battery candles to light them up. Then there is always the option to turn the whole Mason Jar into a candle, as seen in picture (9). These would make great gifts or centrepieces.

Customise and Decoration Ideas

You can create your own Mason Jar designs by taking an ordinary jar and using a glue gun you can write your own words. A little spray paint later and you have your own jar design (10).

Or how about taking out some glass paint to colorise the jars to your liking (11). 1/2/3/4/5/6/7/8/9/10/11

Related Posts:

December 25, 2013 in Decor, DIY

Getting Crafty: DIY Outdoor Lighting Ideas

Outdoor DIY Lighting Ideas

With a little creativity, there is a lot that can be done in the DIY department when it comes to outdoor lighting. The good thing about the DIY outdoor lighting ideas below is that they don’t require any hard wiring.

The Beauty of the Flame

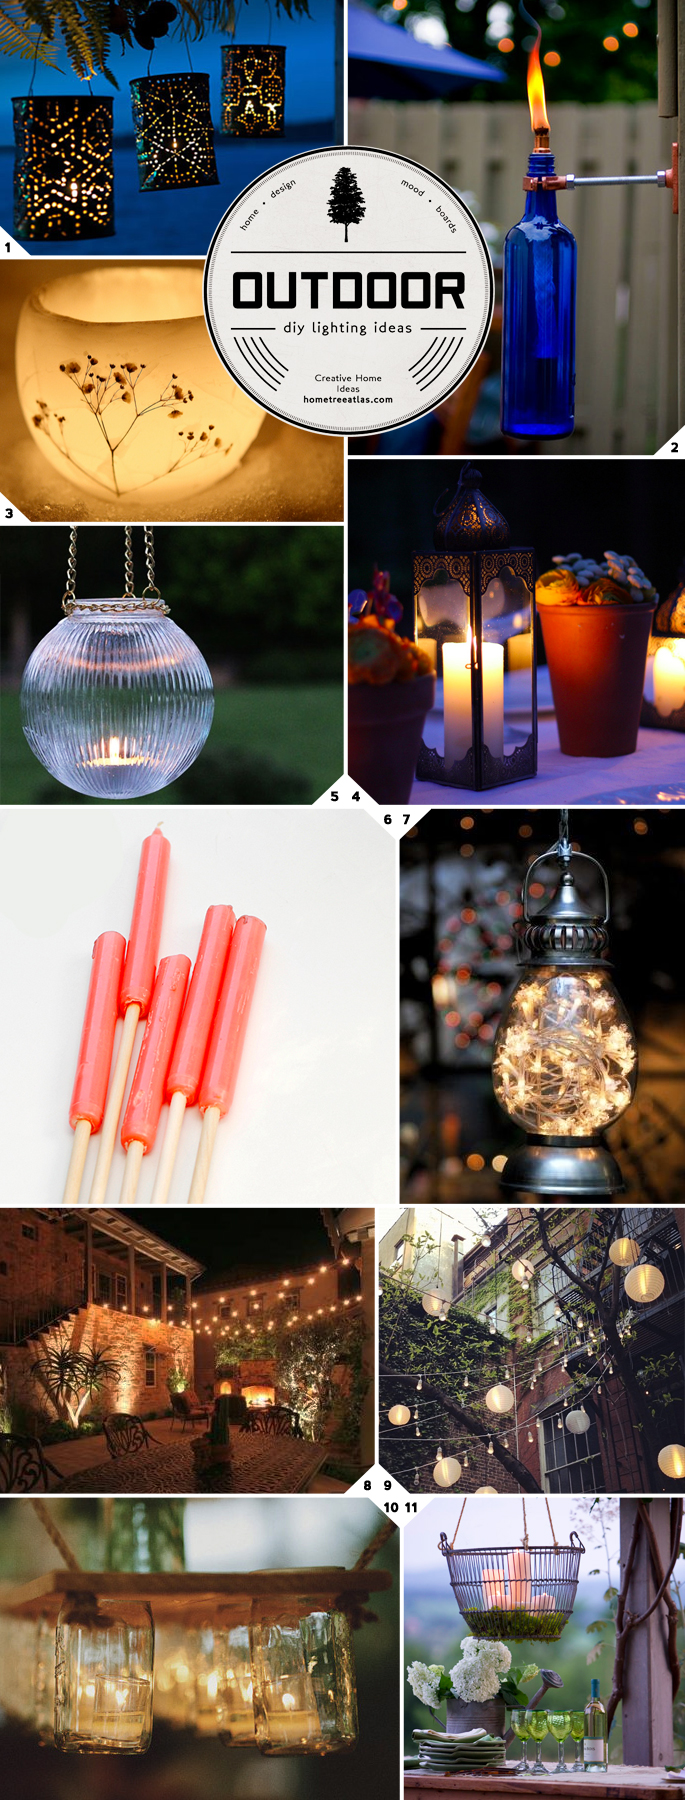
One quick way of adding lighting outdoors is by using fire! Design Sponge has 2 great DIY lighting projects. The first is a tin can lantern that has holes punched in them to add a decorative flair seen in picture (1). The second project is a how to guide to making the elegant bottle tiki torches in picture (2).

If it is winter time, why not use 2 bowls (one small bowl weighed down in a bigger bowl) to create ice lanterns. Freeze in some plants or flowers at the same time to add in some decor. Pop in a votive candle and you are done – you have your own ice lantern (3) perfect for a winter wedding or just garden decor.

Any outdoor table, like on a patio (Low Effort Decor: Easy to Do Patio Lighting Ideas), can have some tabletop lighting added to it. Candles in lanterns (to protect from the wind) work as seen in picture (4), so do oil lanterns and battery operated/wireless lights.

Hanging votive candles are a beautiful sight. Head on over to In My Own Style to see how to make the hanging glass globe votive holders seen in picture (5).

And how about this simply ingenious idea by a A Subtle Revelry (6). Just by using candles and wooden stakes you can quickly make your own tiki torches.

Oh String Lights

One of my favourite light fixtures (they are so cheap, and so much can be done with them!). Check out my post here for a bunch of photos and ideas on what can be done with them outdoors: Home Decor Ideas: Creative Ways of Using String Lights Outdoors. In picture (7) string lights have been stuffed inside an old oil lantern to create a hanging lamp.

Wrap string lights around a hola hoop and hang that up to create your own DIY outdoor chandelier. Wrap them around trees, railings – anything really! Hang them overhead to create a nice soft glow (8). Paper lanterns can also be added to the mix to create a romantic and whimsical outdoor setting – just like in picture (9).

From the Sun

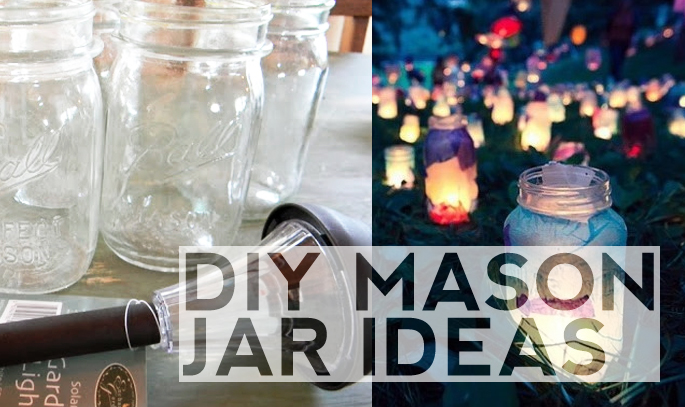
On the solar front, old mason jars and solar lights can be combined to create elegant SunJars seen below. You can follow along with the instructions at Creative Cain Cabin. Mason Jars can also be used as votive (or battery powered) candle lanterns – just like in the picture below. Check out my post here for more Mason Jar ideas: Home Decor Ideas: Using Mason Jars.

Mason Jar DIY Ideas

An Outdoor Chandelier

There are a few ways you can go about creating your own outdoor chandelier. One way is to use string lights and a hula hoop, mentioned above. In picture (10) a chandelier has been made using jars, a piece of wood and candles. Or how about using a large plant basket to hang up an arrangement of candles (11). 10/11

Related Posts:

December 25, 2013 in DIY, Lighting

Home Decor Ideas: Using Your Printer

Home Decor Ideas Using a Printer

There are a lot of amazing home decor projects you can do with your printer. You’ve got everything from different kinds of DIY transfer papers to printables, and plotter prints. You can get really crafty, or there are ideas that just require you to hit the ‘print’ button

Transfer Magic

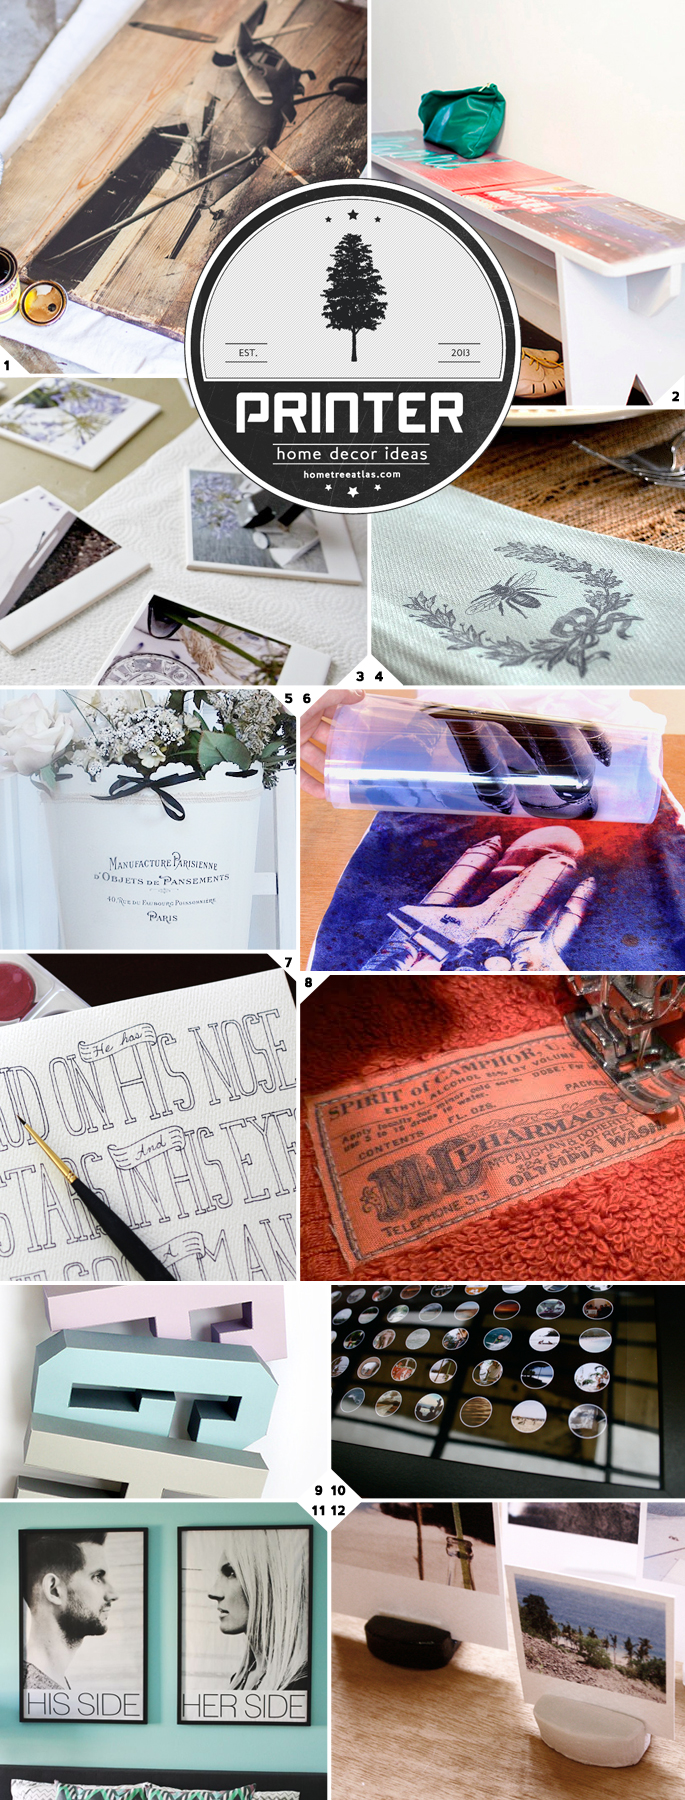
Transferring onto wood is a great home decor piece to have. Black and white photos look best on raw wood. For this though you’ll need a Lazerjet printer, or find someone who does. You can find the directions to making the black and white wooden photo in picture (1) here. A white backdrop works best if you want to do a color transfer – just check out the bench in picture (2) from Poppy Talk.

Or how about transferring your photos onto ceramic tiles to create your own homemade coasters (3) – follow along with the instructions here.

You’ve also got fabric transfer printing paper – which is what was used to transfer the bee image onto the napkin (4). Check out Sophia’s Decor to see the other transfers she has done – like transferring vintage graphics onto chairs and tote bags.

Water slide decal paper was used to transfer a free printable onto a flower pot – seen in picture (5) from Lost Bird Studio.

Lumi sun print paints are the the latest thing in photo transferring. What you do: print out a negative image on a transparent sheet (which you can do at home with an Inkjet printer), then you coat your fabric (or other material) with the Lumi Inkodye, place the negative image on top of it and leave it out in the sun. The negative image blocks out the sun, which exposes the image – just like the DIY canvas print in picture (6).

The Gift of The Internet – Printable Ideas

The internet is a true friend when it comes to free printables. You can get everything from artwork and hand lettered quotes, to labels for jars, notebooks and gifts.

Over at Tried and True you can download the outline artwork of the quote from picture (7) and paint it in. Then there are the free antique labels that Cathe over at Just Something I Made has put up for free download. She used the labels to create her own hand towel labels (8) – awesome!

Feel like doing a little origami? Mr Printables has printable templates for creating your own display letters (9).

Plain Printing

Here are some ideas that just require good old fashion printing. First is a confetti sheet of travel photos I created and printed out on glossy paper (10). Check the how to guide here: Travel Photos Confetti Display – Plus DIY Printables Guide.

This next DIY project is an easy one, and cheap. But you will need to go out to a printer like Kinkos or Staples. Ask for Blueprint/Plotter/Engineer prints and you will get some huge black and white pieces for around $5++ just like the one in picture (11) by A Beautiful Mess.

Why not print out your photos, like I did with my travel photos, and create your own little stands. I used air dry clay to make the stands in picture (12) – which you can find the instructions to here.

Related Posts:


Related Posts Plugin for WordPress, Blogger...
December 19, 2013 in Decor, DIY